
Building and Running FreeDV on Raspberry Pi
Matt Roberts - matt-at-kk5jy-dot-net
Published: 2018-03-12
Updated: 2022-06-07
 Recent versions of the Raspberry Pi
single-board computers
feature enough CPU power to run various digimodes, including many offered by Fldigi.
I recently wrote an article explaining how to build that package
on current generation RasPis, but other similar packages are also compatible with the RasPi.
In particular, the FreeDV software can be used with the
RasPi to add a small, low-power, free software
digital voice (DV)
modem to an HF radio.
Recent versions of the Raspberry Pi
single-board computers
feature enough CPU power to run various digimodes, including many offered by Fldigi.
I recently wrote an article explaining how to build that package
on current generation RasPis, but other similar packages are also compatible with the RasPi.
In particular, the FreeDV software can be used with the
RasPi to add a small, low-power, free software
digital voice (DV)
modem to an HF radio.
As with Fldigi, packages for FreeDV on many platforms are either non-existent,
or badly behind the current releases. This is also true of the hamlib radio
interface library used by FreeDV. As a result, building a current version
of FreeDV with current libraries can be very helpful. This is a step-by-step
guide on how to do this.
These steps should work with little or no modification on other RasPi distributions.
I have even used them for Ubuntu and
Linux Mint, so they should work on most Linux
distributions. The main differences, if any, will be in the package names of
prerequisites.
The FreeDV build process is documented in the README.md file included with
the source download. This guide is slightly modified from those instructions, to
build and use an updated hamlib package.
The Basics
This guide assumes that you have a Raspberry Pi, running a recent version of
Raspberry Pi OS,
and that you have already completed the
installation process.
It also assumes that you have the graphical desktop running, which you will need
to display the FreeDV GUI. To build FreeDV, you will need the
build-essential meta-package installed, but this is the default for recent
versions of Raspbian.
Getting the Source
The FreeDV software is now built from source
via Git checkout. We will also build the hamlib package, available
from its own
GitHub page, to provide support for the latest radios. The only source
file to be downloaded is:
hamlib-4.3.1.tar.gz
Place this file in your home directory on the RasPi, which is probably /home/pi.
The newest versions of hamlib may be higher than shown here. If you use a
newer version, don't forget to use the newer version number in each of the steps
below.
Preparing for the Build
One step that I like to perform before building software on Linux is to set some
compiler optimization flags, so that the compiled code will be the most efficient
for the RasPi. If you elect this step, you'll need to determine the proper
flags for your machine. If you have a recent version of Raspberry Pi OS,
you can set the flags to select the best values at runtime. To do this, run
these commands in the terminal before proceeding:
export CXXFLAGS='-O2 -march=native -mtune=native'
export CFLAGS='-O2 -march=native -mtune=native'
When the native architecture keyword is used, GCC will attempt to determine
the best architecture flags dynamically at build time. This prevents having to
guess at the best target architecture. This step also works on PC-based builds,
as well as on the RasPi.
Note that the option -O2 is dash-oscar-two, not dash-zero-two. The
capital letter 'O' option tells GCC to generate optimized code whenever it can,
and the number tells it how aggressive to be when finding things to optimize.
The -O2 option is considered safe on all production CPU targets, so that's
what I use for my builds.
Prerequisite Packages
The build process also requires a number of prerequisites. These include GUI, image,
and sound libraries, among others. Most of these will be readily available
from the Raspbian repositories. The hamlib package will be built from
source. Installing and building the prerequisite packages should be done at a
command prompt, most likely a terminal.
First we will install the prerequisite system packages. These are packages that are
maintained by the Raspbian team, and can be installed using apt-get. The only
requirement is that the RasPi needs to have some kind of Internet access, so it can download
the packages from the Raspbian repositories.
At a terminal prompt, run the following commands, one after another.
sudo apt-get update
sudo apt-get install cmake
sudo apt-get install sox
sudo apt-get install git
sudo apt-get install libao-dev
sudo apt-get install libspeexdsp-dev
sudo apt-get install libwxgtk3.0-gtk3-dev
sudo apt-get install libsndfile-dev
sudo apt-get install libusb-1.0-0-dev
sudo apt-get install libsamplerate0-dev
sudo apt-get install libasound2-dev
sudo apt-get install libgsm1-dev
sudo apt-get install libsndfile1-dev
sudo apt-get install libjpeg9-dev
sudo apt-get install libxft-dev
sudo apt-get install libxinerama-dev
sudo apt-get install libxcursor-dev
sudo apt-get install module-assistant
sudo apt-get install portaudio19-dev
Some of these packages may already be installed. If any of these commands responds
with "package is already the newest version", just skip to the next one.
Some of these packages may have other dependencies, so each command may install more than one package.
This is normal, so just sit back and watch it all install.
The first prerequisite to build is the hamlib package. While the
Raspbian distribution includes a build of hamlib, it is very old, and
does not include many radios from the last several years. So when I build FreeDV
(or any software that uses hamlib for radio control), I build a more recent version
of hamlib, to run my newer radios. First, make sure that hamlib is not
already installed:
sudo apt-get remove libhamlib2
If this gives you a message saying that the package was not installed, you're done.
Otherwise the system will prompt you to uninstall the package.
Then we build its replacement:
tar -zxvf hamlib-4.3.1.tar.gz
cd hamlib-4.3.1
./configure
make
sudo make install
sudo ldconfig
cd ..
At this point, the packages needed to build FreeDV programs should be available
on your system.
Building FreeDV
Now you should be ready to build FreeDV itself:
git clone https://github.com/drowe67/freedv-gui.git
cd freedv-gui
./build_linux.sh pulseaudio
That should provide you with the FreeDV program and several associated tools
installed in /usr/local/bin. You should be able to now run and use
the FreeDV program:
./build_linux/src/freedv
Which should result in the FreeDV root window:
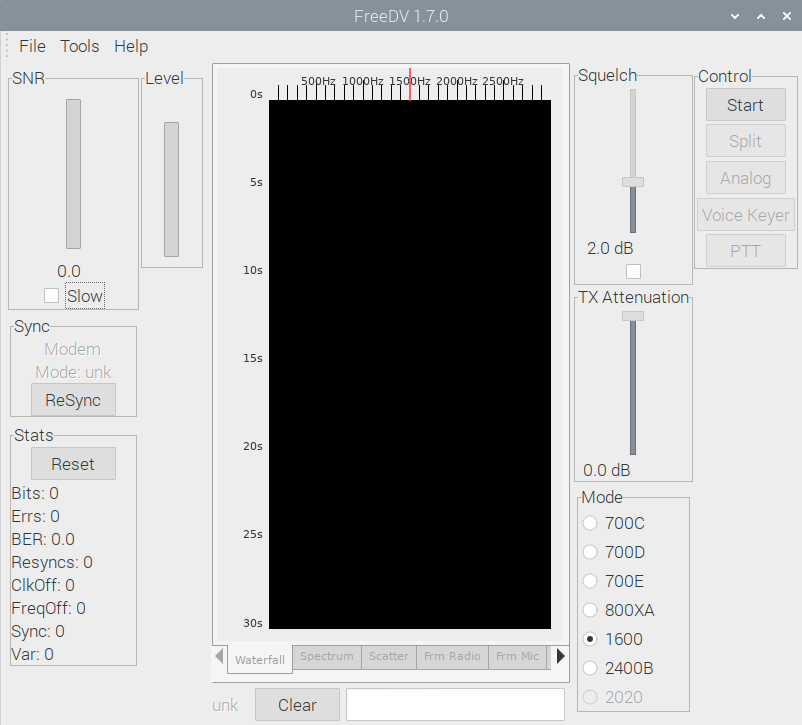
FreeDV Application Window
If you want to install the application permanently, you will need to manually copy the
executable:
sudo install -o root -g root ./build_linux/src/freedv /usr/local/bin/
The Raspberry Pi, like many SBCs, is a hobbyist board. If something goes wrong, you may
have to do a little troubleshooting to figure out what needs adjustment. Hardware in
particular can be a bit of a challenge, finding serial ports, sound card names, etc. Don't be
afraid to experiment.
A Note on Serial Devices
Nearly all serial devices (used for radio control) on modern machines are USB-to-serial
converters. This includes radios that have a dedicated USB port for such purposes.
The serial drivers on most Linux distributions, including Raspbian, tend to assign
hot-plug USB devices to one of the /dev/ttyUSB* device nodes, and those devices are
normally owned by root and the dialout group. In order to access
such devices for radio control, the user running FreeDV needs to be a member of the
dialout group.
Assuming you are logged in as the default user of pi, adding permissions to
access serial devices is as simple as running:
sudo usermod -a -G dialout pi
...at a terminal prompt. That tells Linux to add the user pi to the
group dialout. In order for that change to take effect, you need to
either reboot, or logout and then login again.
In order to determine the USB port name assigned to your radio, I have found that
the easiest thing is to start the machine with the USB device disconnected, then
once you have logged in, connect the USB device, and then immediately run the
command:
dmesg
This will produce a lot of output, but the serial port assigned to your radio
should be one of the last things displayed. For example, this is the output
of dmesg when my Kenwood TS-590SG is connected:
usb 1-5: new high-speed USB device number 8 using xhci_hcd
usb 1-5: New USB device found, idVendor=0424, idProduct=2512
usb 1-5: New USB device strings: Mfr=0, Product=0, SerialNumber=0
hub 1-5:1.0: USB hub found
hub 1-5:1.0: 2 ports detected
usb 1-5.1: new full-speed USB device number 9 using xhci_hcd
usb 1-5.1: New USB device found, idVendor=08bb, idProduct=29b3
usb 1-5.1: New USB device strings: Mfr=1, Product=2, SerialNumber=0
usb 1-5.1: Product: USB Audio CODEC
usb 1-5.1: Manufacturer: Burr-Brown from TI
usb 1-5.1: ep 0x85 - rounding interval to 64 microframes, ep desc says 80 microframes
input: Burr-Brown from TI USB Audio CODEC  as /devices/pci0000:00/0000:00:14.0/usb1/1-5/1-5.1/1-5.1:1.3/0003:08BB:29B3.0004/input/input21
hid-generic 0003:08BB:29B3.0004: input,hidraw3: USB HID v1.00 Device [Burr-Brown from TI USB Audio CODEC ] on usb-0000:00:14.0-5.1/input3
usbcore: registered new interface driver snd-usb-audio
usb 1-5.2: new full-speed USB device number 10 using xhci_hcd
usb 1-5.2: New USB device found, idVendor=10c4, idProduct=ea60
usb 1-5.2: New USB device strings: Mfr=1, Product=2, SerialNumber=3
usb 1-5.2: Product: CP2102 USB to UART Bridge Controller
usb 1-5.2: Manufacturer: Silicon Labs
usb 1-5.2: SerialNumber: 05670041F5D2
usbcore: registered new interface driver usbserial
usbcore: registered new interface driver usbserial_generic
usbserial: USB Serial support registered for generic
usbcore: registered new interface driver cp210x
usbserial: USB Serial support registered for cp210x
cp210x 1-5.2:1.0: cp210x converter detected
usb 1-5.2: cp210x converter now attached to ttyUSB0
Note that the USB connection detects two devices. One is the sound
device used for digimodes, and the other is the serial device used for radio
control. The last line shows the name of the serial device, ttyUSB0.
When using this serial device in FreeDV, the correct device name to use is
/dev/ttyUSB0.
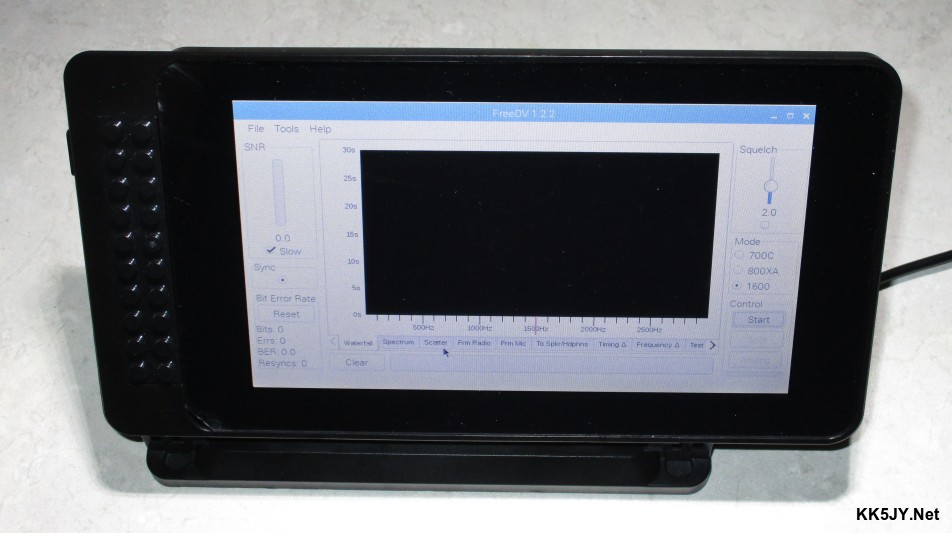
QRP for Computers
There are several ways to equip a RasPi3 for use in the field with a compact
user interface. Below is a picture of a RasPi3 with an
official RasPi touchscreen,
and custom enclosure, running
a recent build of FreeDV.
Such a device can be easily combined with any kind of USB or
Bluetooth keyboard.
Since the screen is a touch-screen no mouse is needed (although adding a
companion USB or Bluetooth mouse is also easy).
This could be used in a "go kit" for digital mode operation
on the road, from a park, while camping, etc. Also quite handy are the
"pi-top" kits,
which can hold a RasPi3, and provides a screen, mouse, and keyboard. This
is another great way to put together a compact, low-power digimode kit for
operation away from home. They even come in some creative
alternative color schemes.
Have fun!
Copyright (C) 2018-2022 by Matt Roberts, KK5JY.
All Rights Reserved.