Building and Running Gqrx on Raspberry Pi
Matt Roberts - matt-at-kk5jy-dot-net
Published: 2020-07-02
Updated: 2024-01-10
 Gqrx
is a software-defined RF
receiver GUI application, which uses the GNU Radio libraries to provide a
feature-rich radio receiver on Linux-based computers.
Gqrx
is a software-defined RF
receiver GUI application, which uses the GNU Radio libraries to provide a
feature-rich radio receiver on Linux-based computers.
With the arrival of the Raspberry Pi 4
single-board computer,
the RasPi platform now has plenty of power to run full-featured
Software-Defined Radio or SDR
software, such as GNU Radio and Gqrx. Combining a
RasPi4 with the newest
RTL-SDR v3
hardware and the Gqrx software, provides a very inexpensive way to
receive virtually any mode on a wide range of radio frequencies.
The Gqrx software is one of the more mature graphical SDR packages available
for Linux in general, and RasPi in particular. However, the software binaries
available from the Gqrx team may not always be built against the latest
libraries or with the compile-time options needed for a specific use, and may
not be optimized for newer CPUs. This guide is intended to fill that small
gap, and show people how to build and install the latest Gqrx software on
the newest RasPi devices.
The Basics
This guide assumes that you have a Raspberry Pi 4, running
RasPi OS v10 (Buster),
and that you have already completed the
installation process
on your RasPi device. It also assumes that you have the graphical desktop
running, which you will need to display the Gqrx GUI. To build Gqrx,
you will need the build-essential meta-package installed, but this is the
default for recent versions of the RasPi OS.
Since the Raspberry Pi OS is ultimately based on Debian Linux, these instructions
should also work for other Linux distributions based on Debian, such as Ubuntu or
Linux Mint.
Getting the Source
The Gqrx website has
links to download the
source package, the current version of which is 2.15.1 as of this writing.
The only file you will need to download is the Gqrx source code, which is
gqrx-2.15.1.tar.xz.
Gqrx is fairly stable, and updates don't happen very often. Even so,
newer versions may be released with version number higher than shown here. The
version numbers I show here are those I have used on the hardware so far, although
newer versions will almost certainly work as well. If you use a newer
version, don't forget to use the newer version number in each of the steps
below.
Place all four files in your home directory on the RasPi, which is probably /home/pi.
Preparing for the Build
One step that I like to perform before building software on Linux is to set some
compiler optimization flags, so that the compiled code will be the most efficient
for the RasPi. Recent versions of GCC allow you to set the flags to
automatically select the best values at runtime. To do this, run these
commands in the terminal before proceeding:
export CXXFLAGS='-O2 -march=native -mtune=native'
export CFLAGS='-O2 -march=native -mtune=native'
When the native architecture keyword is used, GCC will attempt to determine
the best architecture flags dynamically at build time. This prevents having to
guess at the best target architecture. This step also works on PC-based builds,
as well as on the RasPi.
Note that the option -O2 is dash-oscar-two, not dash-zero-two. The
capital letter 'O' option tells GCC to generate optimized code whenever it can,
and the number tells it how aggressive to be when finding things to optimize.
The -O2 option is considered safe on all production CPU targets, so that's
what I use for my builds.
Changes to the CFLAGS and CXXFLAGS need to be entered before building packages,
in order to have any effect. Setting the CFLAGS and CXXFLAGS is
not required, but it does yield machine code that is better optimized
for the RasPi CPU.
Prerequisite Packages
The build process requires a number of prerequisites. These include GUI, image,
and sound libraries, among others. Installing the prerequisite packages can be
done at a terminal prompt, or through the software package manager.
You may wish to build one or more of the prerequisite packages from source, to get the
latest versions of those packages, too. One example might be the GNU Radio or
RTL-SDR libraries. If you do this, simply skip the packages you build from the
list to be installed below.
These packages are maintained by the Raspbian team, and can be installed using
apt. The only requirement is that the RasPi needs to have some kind
of Internet access, so it can download the packages from the repositories.
At a terminal prompt, run the following commands, one after another.
sudo apt update
sudo apt install cmake
sudo apt install build-essential
sudo apt install gnuradio
sudo apt install gnuradio-dev
sudo apt install gr-osmosdr
sudo apt install libgnuradio-osmosdr0.2.0
sudo apt install libosmosdr-dev
sudo apt install libqt5svg5-dev
sudo apt install librtlsdr-dev
sudo apt install osmo-sdr
sudo apt install portaudio19-dev
sudo apt install liborc-0.4-dev
sudo apt install libsndfile1-dev
For older releases of RasPi OS or Raspbian, you will want the QT
development package, which will pull in everything you need:
sudo apt install qt5-default
For newer releases of RasPi OS, or if the qt5-default isn't
available for your Pi, install these, instead:
sudo apt install qttools5-dev
sudo apt install qttools5-dev-tools
sudo apt install qtbase5-dev-tools
Some of these packages may already be installed. If any of these commands responds
with package is already the newest version, just skip to the next one.
Some of these packages may have other dependencies, so each command may install more
than one package. This is normal, so just sit back and watch it all install.
Building Gqrx
Finally, we build Gqrx itself. Let's do this in two steps.
First, extract the source and configure it:
tar -Jxf gqrx-2.15.1.tar.xz
mkdir build-gqrx
cd build-gqrx
cmake -DLINUX_AUDIO_BACKEND=Portaudio ../gqrx-2.15.1
Note that the parameter -DLINUX_AUDIO_BACKEND=Portaudio is optional.
This paramemter will select portaudio as the audio library for playing
received signals. This lets me route this audio directly through ALSA
loopback audio devices, so that I can feed other applications without needing
real sound hardware.
CMake will print several lines as it discovers different libraries on the RasPi,
but it should end with:
-- Generating done
-- Build files have been written to: /home/matt/Projects/gqrx/build
When you see those lines, you can proceed to build the project:
make
Once that completes, you can install the project, which is mostly just the gqrx executable:
sudo make install
cd ..
At this point, Gqrx is installed. If you intend to use the RTL-SDR,
there is another step you will need before using the application.
If you are using RTL-SDR, you will need to disable one of the default kernel modules
in Linux, so that the RTL-SDR can be properly detected and accessed. This is
done by adding a single file to the RasPi configuration.
Using your favorite editor, probably nano, edit the file /etc/modprobe.d/blacklist-rtlsdr.conf.
That is probably a new file on your system, so the file will appear empty.
In that file, place the single line:
blacklist dvb_usb_rtl28xxu
Then reboot your RasPi:
sudo reboot
When the system next restarts, it should pick the correct driver for the
RTL-SDR. The details on why this is necessary is described in more detail
on numerous other websites, so I won't repeat it here.
Running Gqrx
At this point, you are ready to run Gqrx. I run the program as root,
to work around any permission restrictions with the RTL-SDR dongles.
sudo gqrx
There are documents on the 'net describing how to set up udev rules to allow
any user to access the RTL-SDR dongle without root permissions. It's easier for
me to just run the application as root.
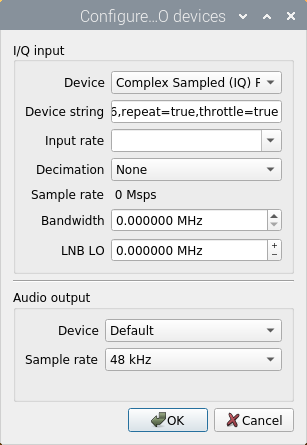
In any event, when you first run Gqrx, you should get the RTL-SDR
configuration window:
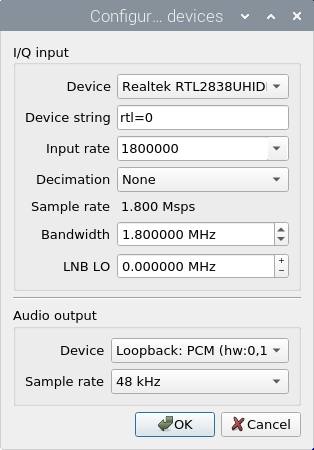
At this point, you will want to configure Gqrx for your device. Since I'm
using an RTL-SDR v3 pointed at an ALSA loopback sound device, my configuration looks
like this:
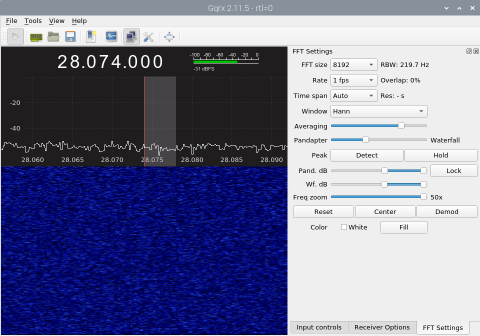
Once configured for your device, click OK. You can then start
Gqrx, by clicking the "play" button in the top-left corner,
and watch the waterfall:
I use a fairly slow waterfall speed (1fps), but the RasPi is capable of much faster
speeds if the bandwidth is reasonable, and the FFT is not too large.
There is a very active community running Gqrx, so be sure to check out the
forums if you have specific application needs, or if you run into problems running
Gqrx with your specific setup.
Copyright (C) 2020-2022 by Matt Roberts, KK5JY.
All Rights Reserved.